
Bicycle Chain Wear Explained
Bicycle Chain Wear Explained: How to Know When to Replace a Bike Chain
If you're a cyclist, the chances are that you understand the significance of a well-maintained drivetrain. A worn-out chain not only affects the performance of your bike but also accelerates wear on other drivetrain components, such as cassette and chainrings. Learning how to detect chain wear and knowing when to replace it can prolong the life of your bike and save you from expensive repairs in the long run. This guide provides more information on chain wear, discusses the benefits of chain checkers, and provides tips on how to prevent chains from becoming dangerously worn.
How is a Bike Chain constructed?
A bike chain has several components, including the pin (or rivet), outer links, inner links, bushings, and rollers. These parts are intricately connected, forming a continuous chain which transfers your pedal power into forward motion!
Understanding the different components of a chain is second nature for us, but not everyone speaks our language. For the purpose of this guide and to help deepen your understanding of bike chain wear, we're going to share a few more fundamentals.
The spacing between the pins in a chain measures 0.5 inches (12.7mm) and is referred to as the chain pitch. This measurement is the industry standard for bicycles and we've never seen a chain that doesn't match this.
Understanding Bike Chain Wear
Chain Stretch
Bicycle chains wear out over time due to a natural process of elongation, commonly referred to as “chain stretch”. While the plates don't actually stretch, the pins and rollers inside the chain wear down with each rotation allowing the plates to sit further apart and increase the overall length of the chain. Measured in percentage, chain wear indicates how much the chain has stretched. A chain is often considered worn once it reaches 0.75% growth from the original 0.5in (12.7mm) pitch.
Slop
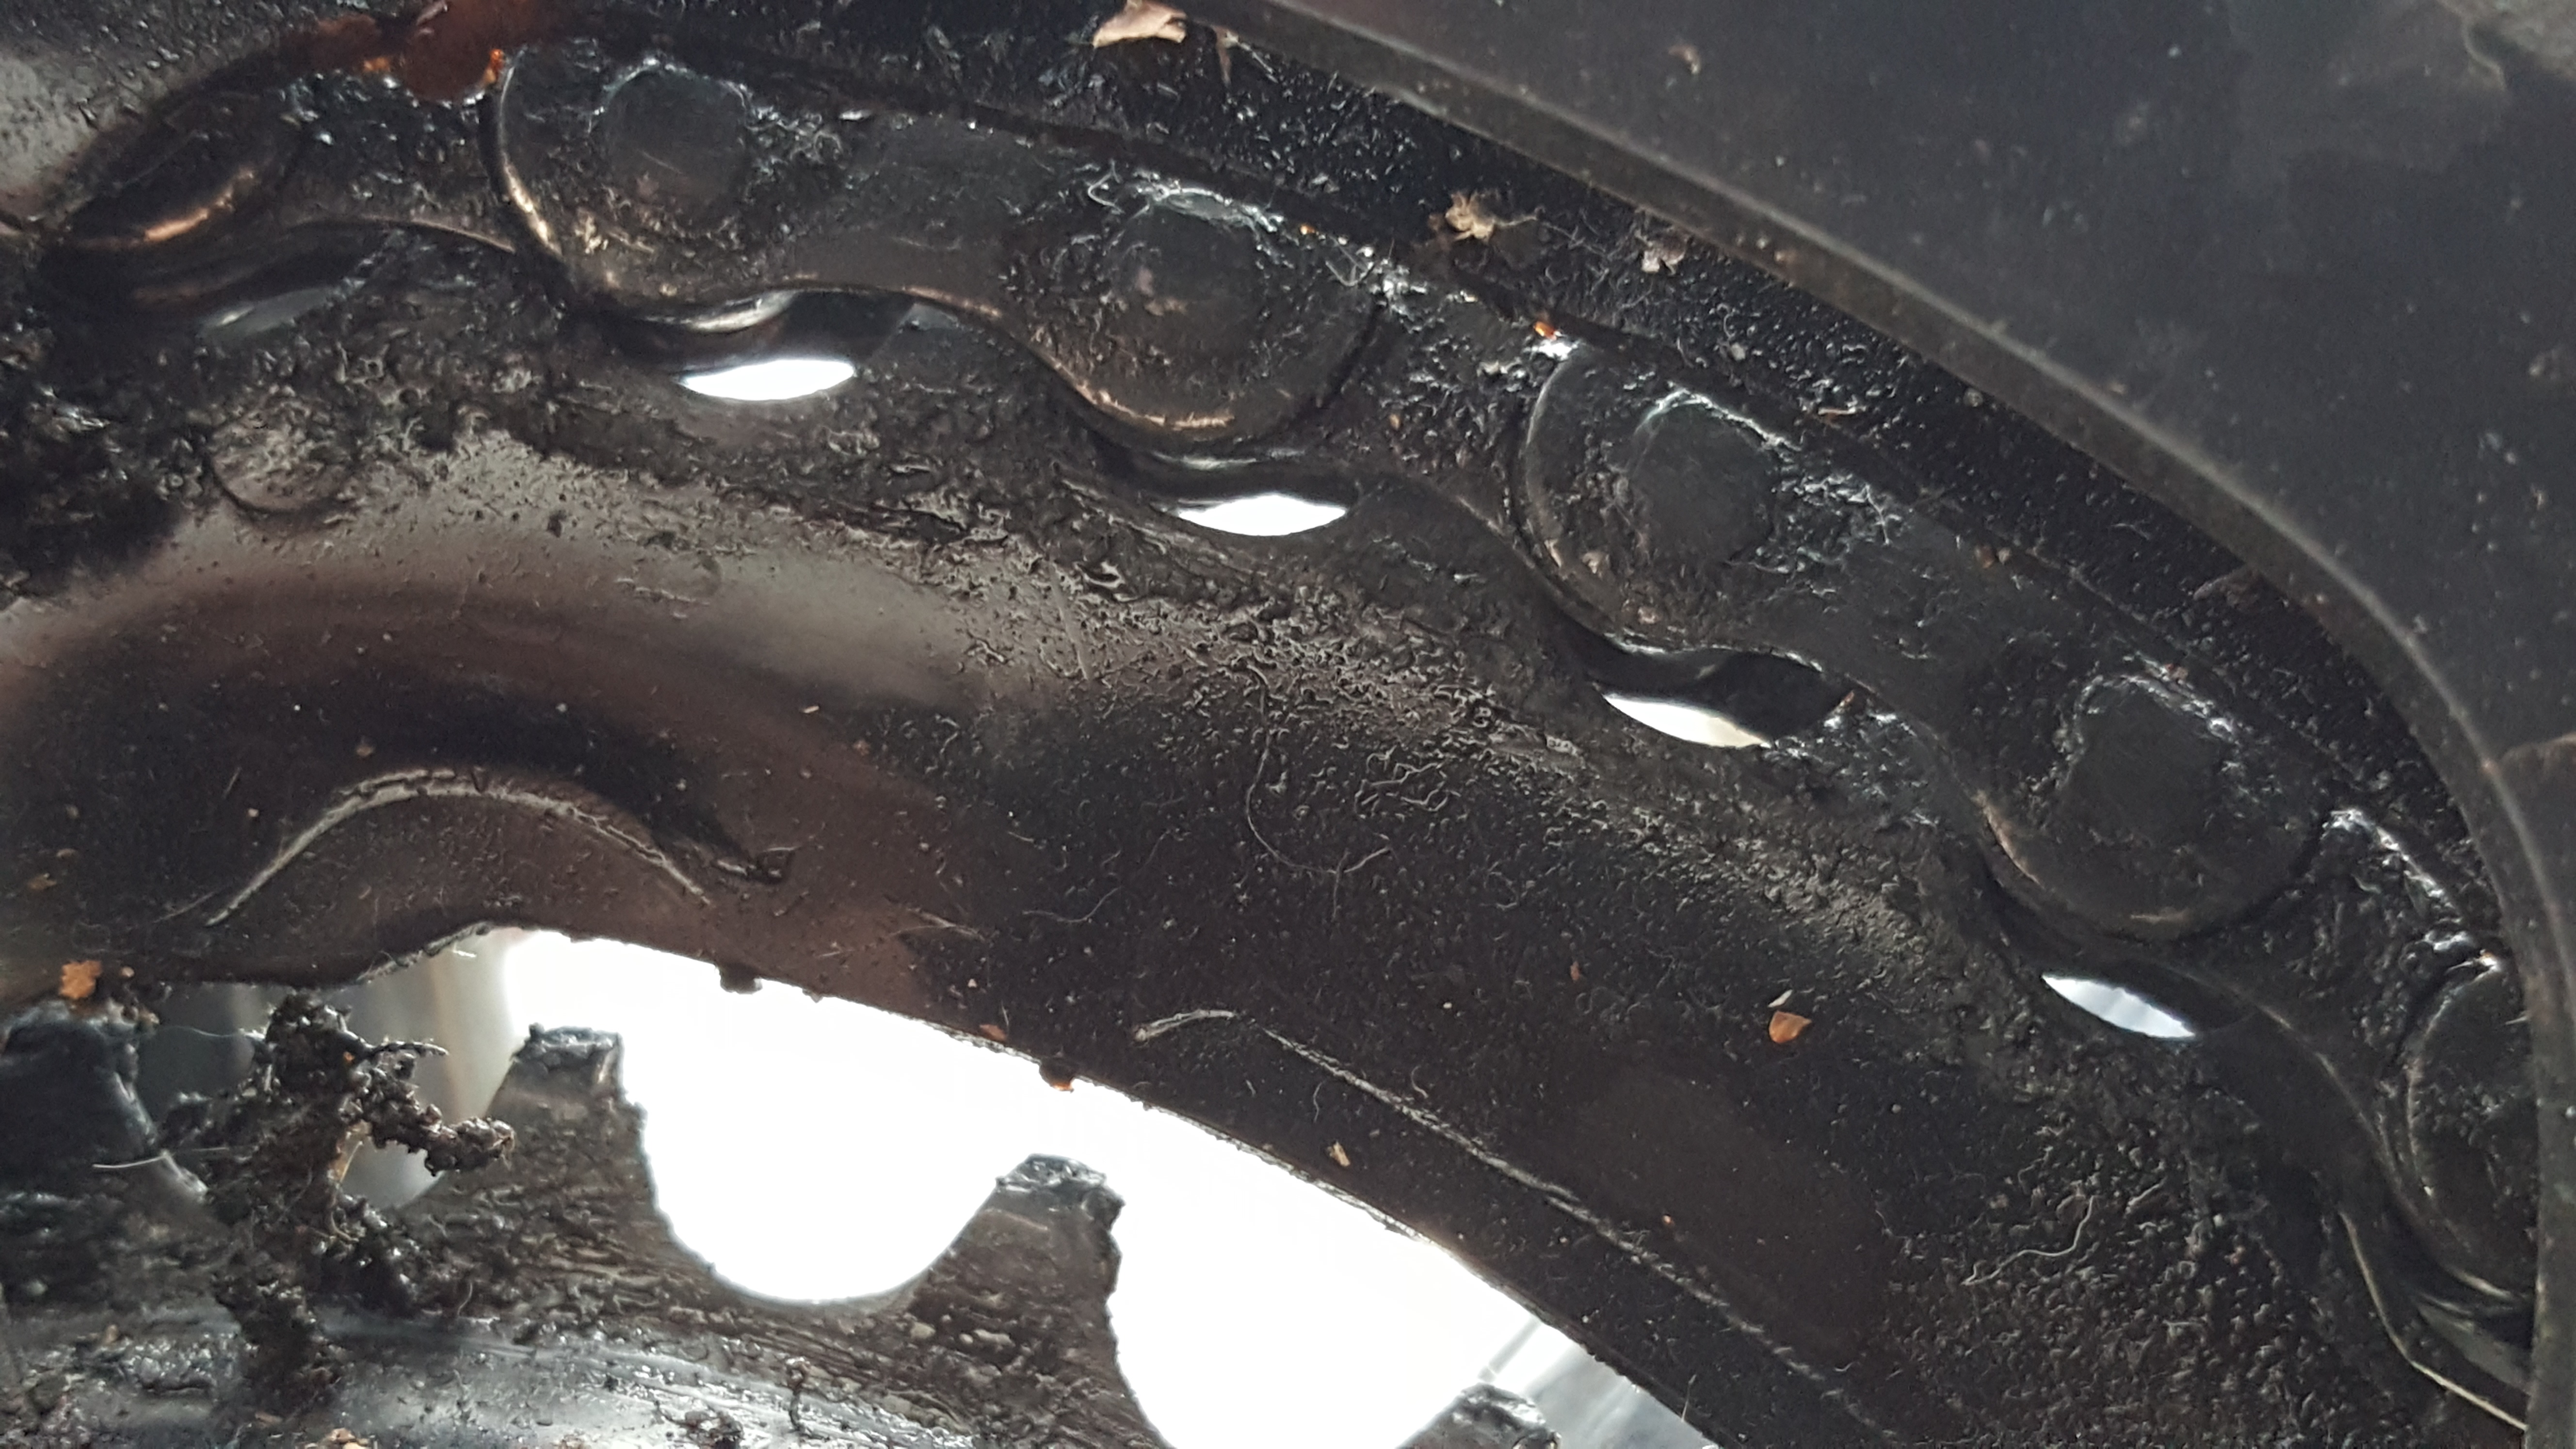
Another form of chain wear is known as “slop”. Unlike “Chain Stretch”, measuring slop isn't as straightforward. It's a common issue among riders who don't exert much force on their drivetrain or prefer a higher cadence. Slop occurs when worn-out rollers cause increased side-to-side movement in the chain. Consequently, shifting becomes less precise because the shifting ramps of the cassette or chainring must work harder to guide the chain onto the desired cog. It's important to note, however, that chain slop doesn't cause as much wear on other components of the bike.
The rate at which a chain wears down is influenced by various factors. These factors include the type of riding and terrain, the materials the components are made of, the choice of gears, and how smoothly gear shifting is performed. Arguably for most experienced cyclists, the most significant factor is the maintenance routine applied to the chain. Proper maintenance can substantially prolong the lifespan of the chain.
Why Should I Care About Chain Wear?
Chain wear not only compromises your bike's performance if left unchecked it can become a dangerous and expensive problem . Poor shifting and decreased efficiency are just the beginning; a severely worn chain is weaker and prone to slipping over the cogs under pressure or worse, snapping. This will always happen when you least expect it to. What’s more, prolonged use of a worn chain can have costly consequences. It doesn't just stop at the chain, it also impacts your cassette and chainrings.
Cassettes and chainrings, as well as being pricier than chains, suffer accelerated wear when a worn chain is left unaddressed. As the pitch increases, the chain rolls higher on the teeth, causing rapid cog wear. If the wear continues, the chain might start skipping over the top of the cog.
However, if you replace the chain before it exceeds its wear limit, you can often avoid these issues. The trick lies in knowing how to check for chain wear.
How to Check Bike Chain Wear
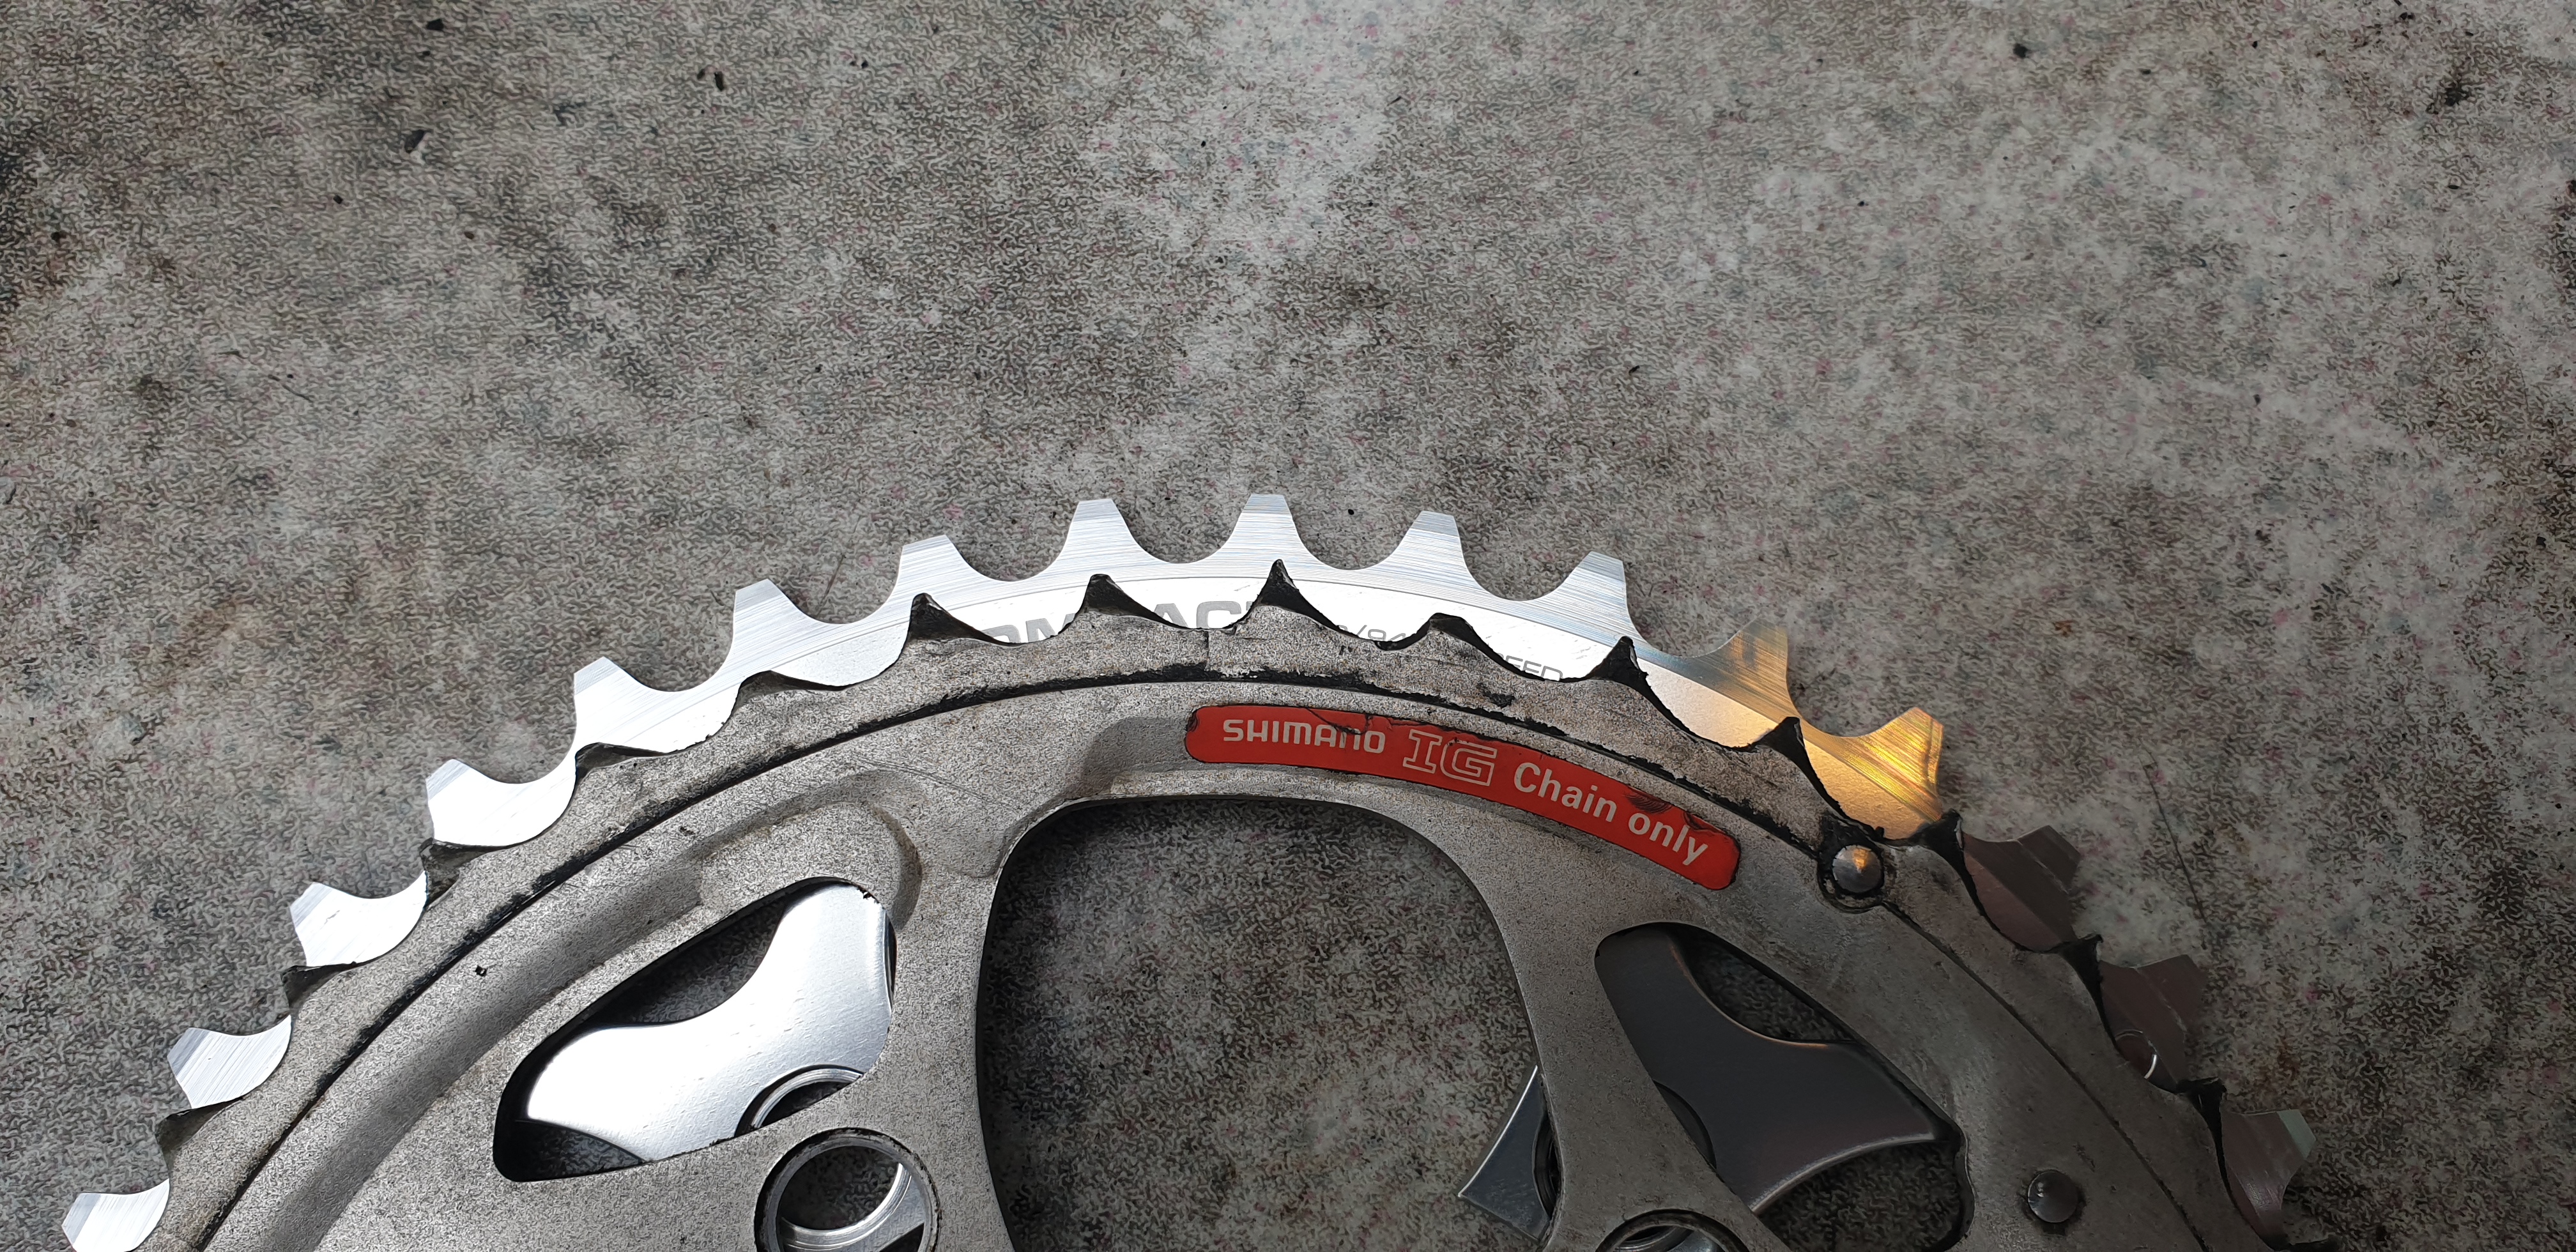
You can tell if your chain and cogs are very worn (and need replacing) if you experience a violent crunching/slipping in the pedals when you push hard. Once this is happening there is no going back and you will need to buy some new components to make it stop. Your chainring teeth may have become very pointed which is a common sign it’s been struggling with a worn chain for too long.
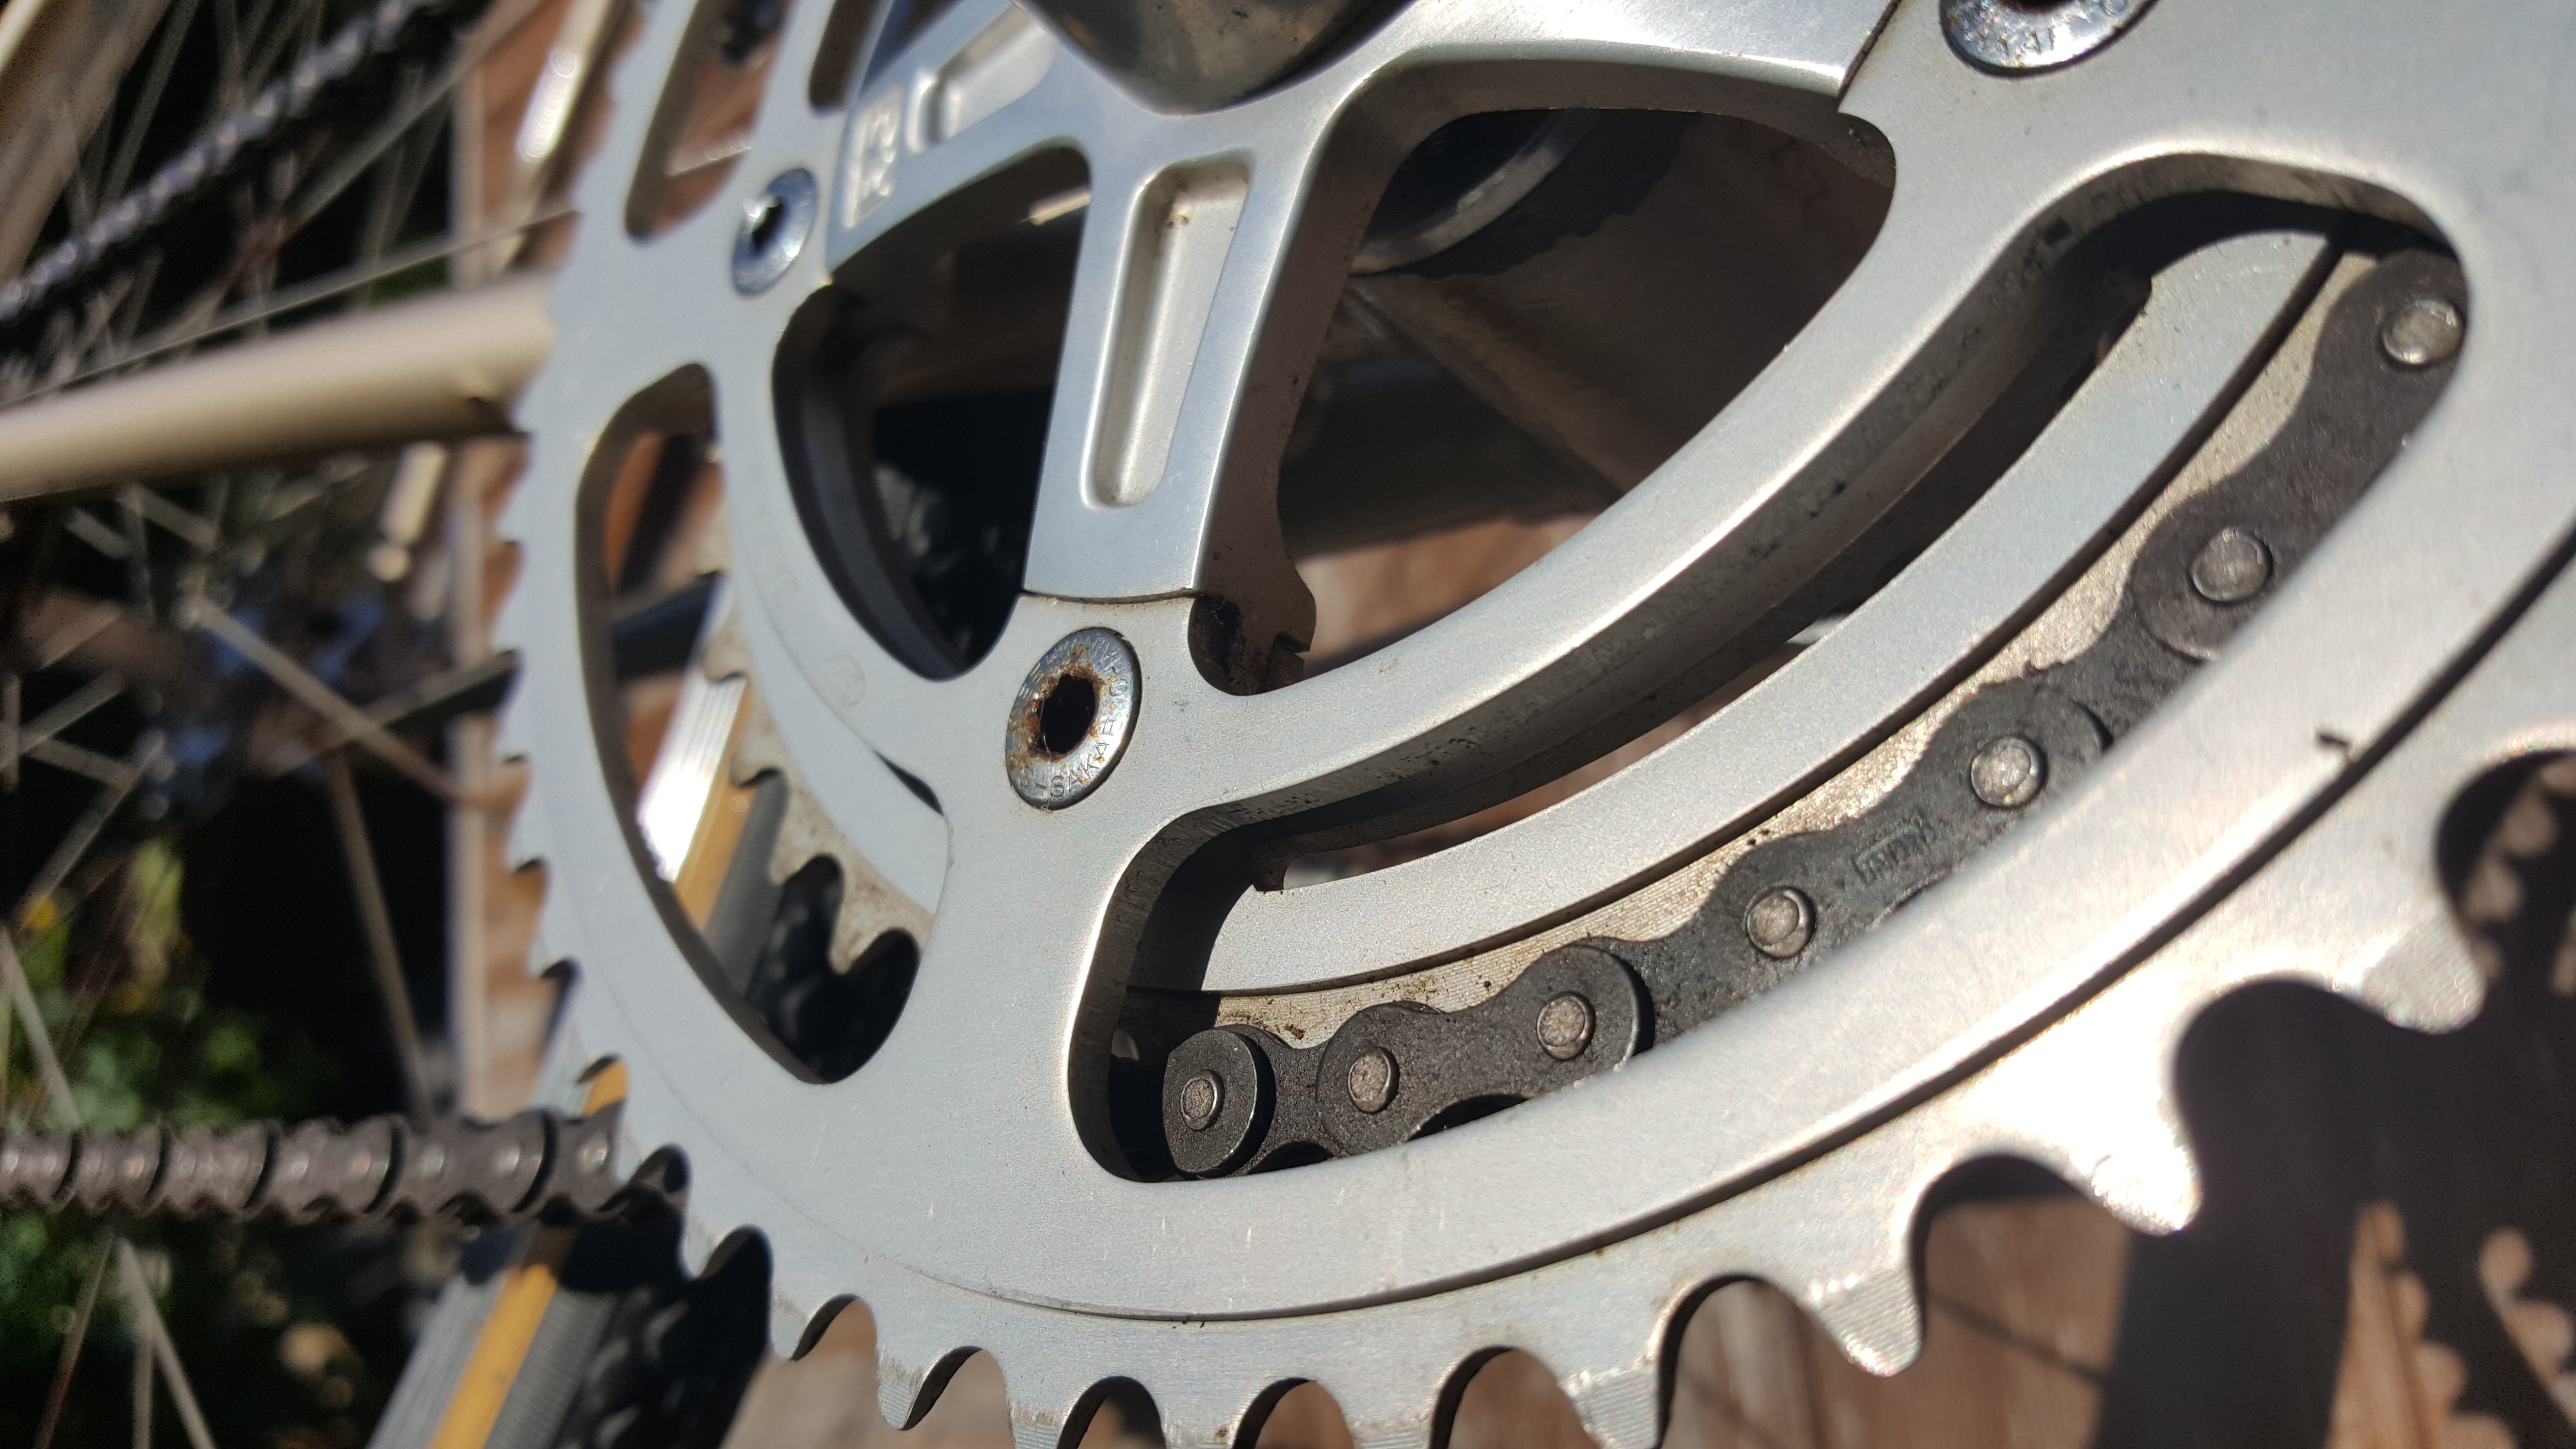
Before this starts you may see some visible “daylight” between the cogs and the chain. It’s easiest to see this on the largest front chainring. You can also tug at the chain on the front edge of the chainring - if there is a lot of slack or you can see the tip of the teeth when doing this then the chain is very worn.
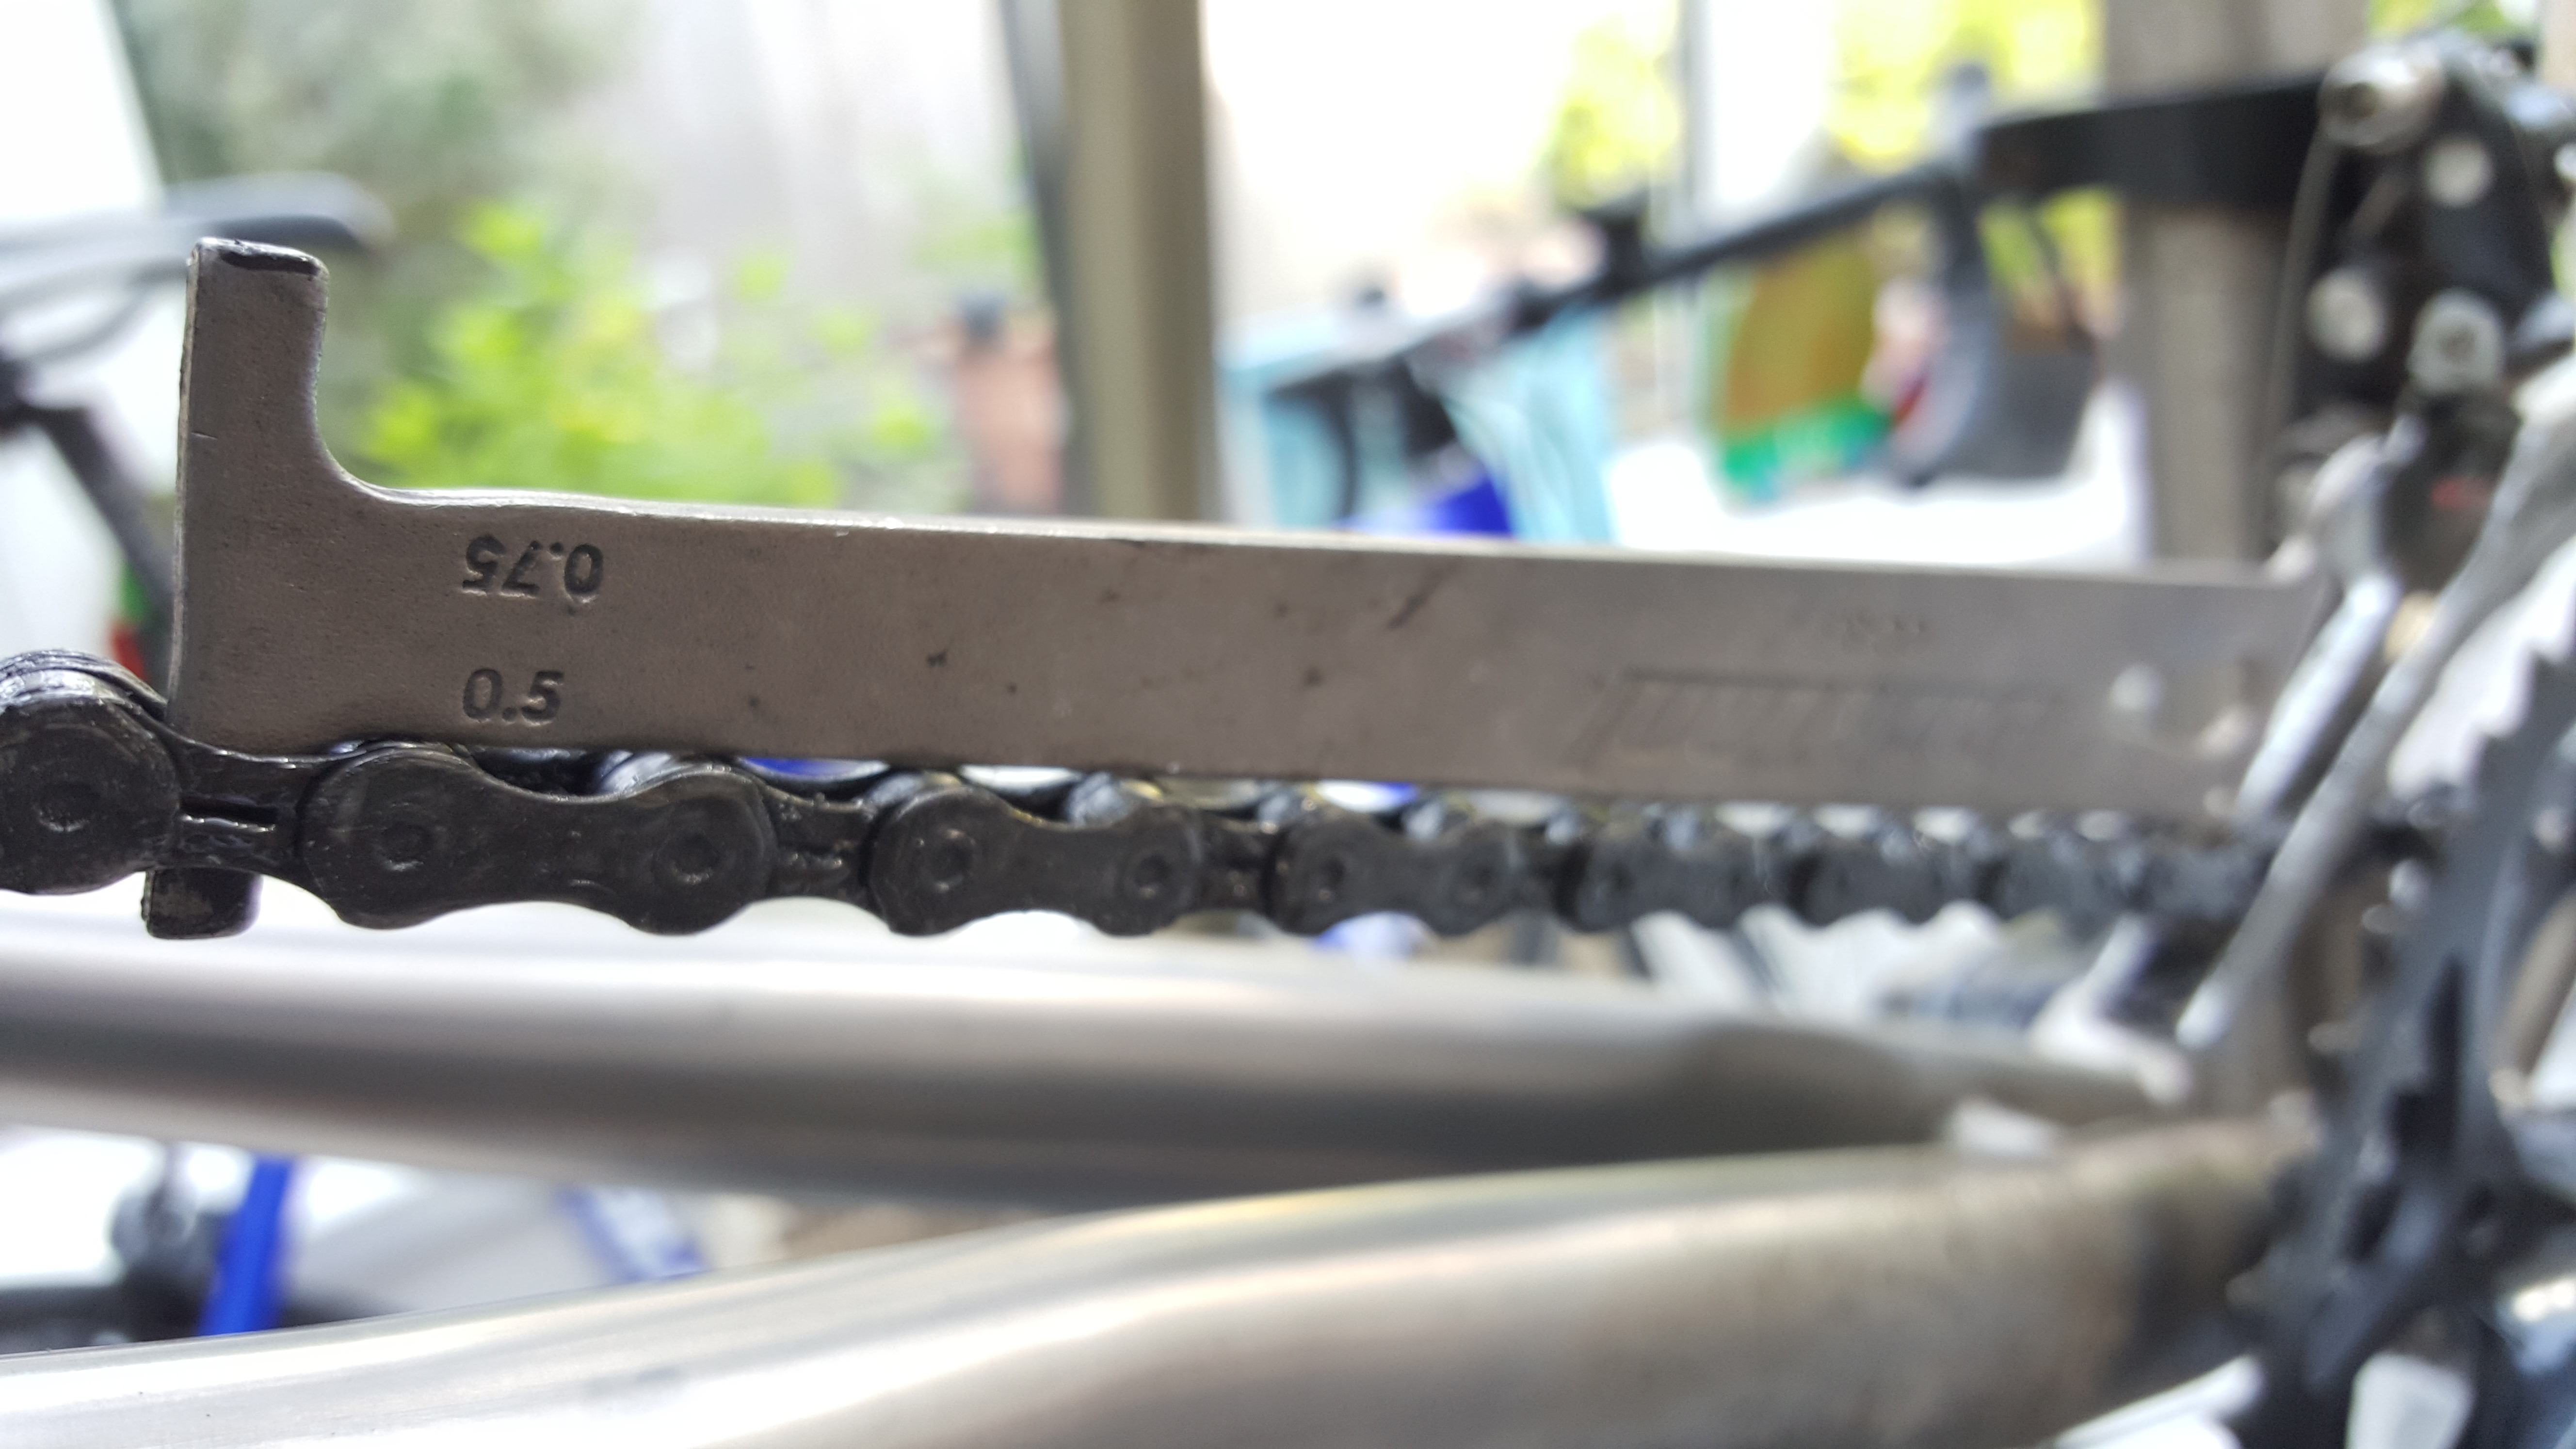
To assess chain wear accurately, we recommend using a specific chain checker tool, although a precise ruler or tape measure can also suffice.
When using a ruler, a new chain should measure precisely 12 inches across 12 links, from the middle of one pin to the middle of the next. The widely agreed-upon threshold for replacing a chain is a 0.75% elongation between links. But it is recommended to replace the chain before it reaches this point.
Once the measurement exceeds 0.5 percent, it's time to think about replacement. If it surpasses 0.75%, the chain has worn considerably, may have worn the cogs - and replacing the cassette might also be necessary. Accurately aligning a ruler to measure these small length differences can be challenging. Chain checker tools offer a quicker, more accurate and practical, accurate result.
One thing to point out is that most chain checker tools usually won’t actually fit into a new chain - only once the chain is worn past the marked amount will the tool indicate the wear. This means you must use it regularly.
Regardless of the measurement method you choose, remember not to include the quick link if you have one installed, as they wear slower than conventional links.
How Often Should I Replace My Bike Chain?
If you have your bike serviced regularly (< 6 monthly) your mechanic should notify you of the current state of your chain - however we may not see your bike at the optimum replacement threshold. We will factor in the wear that will happen before the next service and advise accordingly based on history with you, and our years of experience.
Generally we recommend replacing the chain after(>) 0.5% and before(<) 0.75% to prevent accelerated wear to the cogs - in the majority of cases when we’ve fitted a new chain>0.75% the higher gears slip under pressure.
If you ride a lot, your chain is >0.5% worn and likely to go over 0.75% before your next service, then we will offer you a new chain fitting for convenience.
Bicycle chains don’t wear evenly, so for the most accurate result, it’s best to take measurements on at least three different parts of the chain. It’s also worth noting that the manufacturer’s recommended wear limit can differ from the above.
Unfortunately neither riding distance nor time are an accurate indicator of chain wear, and keeping a check on measurement is the only way to know for sure if you should replace your chain before it becomes obvious. The longer you practise this method, the more you will be able to correlate mileage or time scale to your own chain wear.
How Can I Prevent Chain Wear?
Getting into a routine of regularly checking and cleaning your bike chain will stop contaminants building up, which can act as a grinding paste in the drivetrain and accelerate the rate of wear.
IMPORTANT: As well as degreasing and cleaning the chain, you need to dry it before applying chain lubricant.
6 Tips for Preventing Chain Wear
We’ve included a lot of information in this guide, which we hope you will find useful. But if you only manage to take a few things away from it - these are our top six tips for preventing chain wear overtime:
- Regularly Clean and Lubricate - Clean your chain regularly with a gentle brush /rag and a biodegradable degreaser. This removes dirt and old lubricant, preventing premature wear. Lubricate your chain using a high-quality bike chain lubricant, ensuring it penetrates the rollers and pins. Wipe off excess lubricant to prevent attracting dirt.
- Practice Proper Shifting and Gear Usage - Avoid putting excessive force on the pedals, especially when climbing hills to help shift smoothly. This reduces strain on the chain, which in turn will preserve its longevity. Cross-chaining (using extreme combinations of gears) can also strain the chain.
- Replace your Chain Before It’s Too Late! - Regularly monitor your chain for wear. If you wait too long, a worn chain can damage other drivetrain components, leading to costly repairs and potentially accidents in the future.
- Invest in Quality Components - Invest in a high-quality chain from a reputable brand. Quality chains tend to last longer and offer better resistance to wear. Speak to us for a tailored recommendation for your bike.
- Keep an Eye on the Cassette and Chainrings - Fitting a new chain on a severely worn cassette or chainrings will cause skipping and poor performance. If you're replacing the chain, assess the condition of other components and replace them if necessary. If you're unsure of the history of your drivetrain use / replacements (i.e. a second hand bike) we recommend replacing at least the chain and cassette in order to “reset”. Once you know where you start from and measure regularly you’ll start to get a feel for it over time.
-
Store Your Bike Properly - When you’re not using it, store your bike indoors or at least under dry cover. Exposure to the elements can accelerate wear and rusting.
Speak to us about our pre-hibernation service
In summary, understanding when and how to replace your bike chain is essential for maintaining your bike's performance and ensuring a smooth ride every time. Regardless of how often you have it professionally serviced by taking a small amount of time out to check your chain for wear, adopting proper maintenance practices and investing in quality components, you can prolong the lifespan of your bike’s drivetrain, save money on repairs, and enjoy a safer, more rewarding cycling experience.
Mailing List
Contact & Booking
Booking Form
Social Media